
【Java】数学関数を利用した移動アニメーション
本稿は、シューティングゲームやアクションゲーム等、弾を移動させたりするようなゲームで利用することになる数学関数を利用したアニメーションを実装してみたいと思います。
ここで特に覚えてほしいのは、sinメソッド、cosメソッド、atan2メソッドの三つです。
その他にも、角度をラジアンに変換してくれるtoRadiansメソッドも使います。合わせて、toDegreesメソッドも覚えておくとなお良いです。
今回はこれらの関数をsin,cos,atan2メソッド中心で使用し、アニメーションを作成してみます。
サンプルでは非効率な部分もありますが、今はやりたいことができれば問題ないでしょう。
下記は今回使うベースのウィンドウクラスです。
import java.awt.Color;
import java.awt.Graphics;
import java.awt.Insets;

import javax.swing.JFrame;
import javax.swing.JPanel;

public class Test{
	public static void main(String[] args) {
		GameWindow gw = new GameWindow("テストウィンドウ",400,300);
		gw.setVisible(true);
		gw.change(new DrawCanvas());
		gw.startGameLoop();
	}
}
class GameWindow extends JFrame implements Runnable{
	private Thread th = null;
	private double sleepAddTime;
	private int fps=60;
	public GameWindow(String title, int width, int height) {
		super(title);
		setDefaultCloseOperation(EXIT_ON_CLOSE);
		setSize(width,height);
		setLocationRelativeTo(null);
		setLayout(null);
		setResizable(false);
		setFps(fps);
	}
	public synchronized void change(JPanel p) {
		getContentPane().removeAll();
		Insets inset = getInsets();
		p.setBounds(-inset.left,-inset.top,getWidth(),getHeight());
		add(p);
		validate();
		repaint();
	}
	public synchronized void startGameLoop(){
		if ( th == null ) {
			th = new Thread(this);
			th.start();
		}
	}
	public synchronized void stopGameLoop(){
		if ( th != null ) {
			th = null;
		}
	}
	public void run(){
		double nextTime = System.currentTimeMillis() + sleepAddTime;
		while(th != null){
			try{
				long res = (long)nextTime - System.currentTimeMillis();
				if ( res < 0 ) res = 0;
				Thread.sleep(res);
				repaint();
				nextTime += sleepAddTime;
			}catch(InterruptedException e){
				e.printStackTrace();
			}
		}
	}
	public void setFps(int fps){
		if ( fps < 10 || fps > 60 ) {
			throw new IllegalArgumentException("fpsの設定は10~60の間で指定してください。");
		}
		this.fps = fps;
		sleepAddTime = 1000.0 / fps;
	}
}
class DrawCanvas extends JPanel{
//ここにアニメーション処理を記述
}
中心座標の周りを回転させる
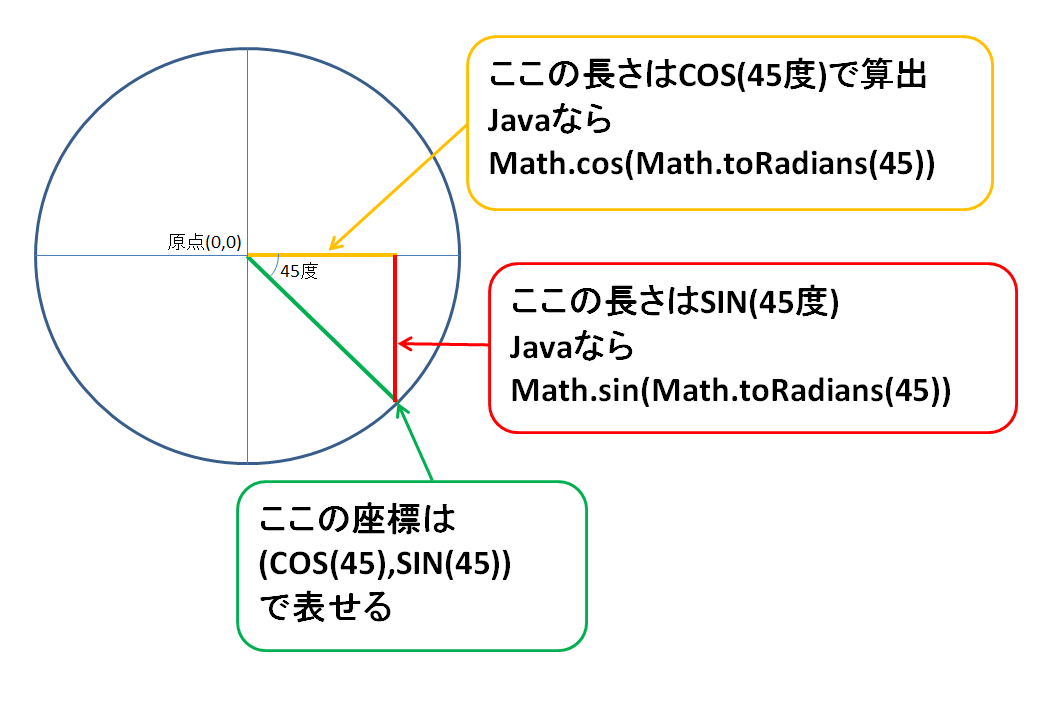
中心座標の周りを回転させる場合はsin、cosメソッドが使用できます。
sin、cosメソッドは円の中心点からその角度へ移動させるための比率を指定できますので、算出した比率と中心点からの距離を乗算し、適度な円運動アニメーションを作成できます。
sin,cosを利用して座標を求める
それではサンプルをご覧ください。
class DrawCanvas extends JPanel{

	//中心点x,y
	int cx=200,cy=150;

	//角度を36個用意する
	int[] angle = new int[36];
	DrawCanvas() {
		//360度のうち10度間隔で値を設定
		for ( int i = 0;i < angle.length;i++ ) {
			angle[i] = i * 10;
		}
	}
	public void paintComponent(Graphics g) {
		super.paintComponent(g);

		g.setColor(Color.BLACK);
		g.fillRect(0, 0, 400, 300);

		g.setColor(Color.WHITE);
		g.fillOval(cx-5, cy-5, 10, 10);

		g.setColor(Color.ORANGE);

		//中心点からの距離を100に設定
		int distance = 100;

		for ( int i = 0;i < angle.length;i++ ) {
			//1度ずつ回転させます。
			angle[i]++;

			//角度をラジアンに変換
			double rad = Math.toRadians(angle[i]);

			//その角度のx座標+中心点を算出する
			int rx = (int)(Math.cos(rad) * distance) + cx;

			//その角度のy座標+中心点を算出する
			int ry = (int)(Math.sin(rad) * distance) + cy;

			//その角度の弾を描画
			g.fillOval(rx-5, ry-5, 10, 10);
		}
	}
}
distanceを大きくすればより大きな円となります。中心点cx,cyの周りを回転してほしいのでそれぞれ加算しています。
sinに乗算する距離の値とcosに乗算する距離の値を変更することで楕円上に回転させるアニメーションも簡単に作れます。
興味があれば試してみてださい。
敵に向かって弾を撃つ
敵に向かって弾を発射する場合は始点から終点のx距離、y距離をatan2メソッドにかけて、sin、cosメソッドでx、y座標の移動量を算出します。
sin、cosメソッドは円の中心点からその角度へ移動させるための比率を算出できますが、あくまで比率なので絶対値が1以下になってしまいます。
ちょっと値が小さいと思った場合は速度で乗算してやることで適度な移動量が設定できます。
それではサンプルソースをご覧ください。
class DrawCanvas extends JPanel{

	//開始x,y
	double sx=50,sy=150;

	//目的地x,y
	int ex=350,ey=50;

	//移動速度
	int speed = 2;

	//角度のラジアン
	double angleRad;

	DrawCanvas(){
		//開始点と終了点の角度のラジアンを求める
		//引数には開始点と終了点のy,xのそれぞれの距離を指定
		angleRad = Math.atan2(ey-sy,ex-sx);
	}
	public void paintComponent(Graphics g) {
		super.paintComponent(g);

		g.setColor(Color.BLACK);
		g.fillRect(0, 0, 400, 300);

		g.setColor(Color.WHITE);
		g.fillOval(ex-5, ey-5, 10, 10);

		g.setColor(Color.ORANGE);


		//角度のx座標*速度で算出する
		sx += Math.cos(angleRad) * speed;

		//角度のy座標*速度で算出する
		sy += Math.sin(angleRad) * speed;

		//弾を描画
		g.fillOval((int)sx-5, (int)sy-5, 10, 10);
	}
}
敵にホーミングする弾を撃つ
ホーミング弾の実装は敵に向かって弾を発射できれば簡単です。
毎フレーム角度の算出をしなおせば簡単にホーミング弾を作れます。
class DrawCanvas extends JPanel{

	//開始x,y
	double sx=50,sy=150;

	//目的地x,y
	int ex=350,ey=50;

	//移動速度
	int speed = 1;

	//目的地の移動速度
	int targetMY = 1;

	public void paintComponent(Graphics g) {
		super.paintComponent(g);

		g.setColor(Color.BLACK);
		g.fillRect(0, 0, 400, 300);

		g.setColor(Color.WHITE);
		g.fillOval(ex-5, ey-5, 10, 10);

		g.setColor(Color.ORANGE);

		//開始点と終了点の角度のラジアンを求める
		//引数には開始点と終了点のy,xのそれぞれの距離を指定
		double angleRad = Math.atan2(ey-sy,ex-sx);

		//角度のx座標+中心点を算出する
		sx += Math.cos(angleRad) * speed;

		//角度のy座標+中心点を算出する
		sy += Math.sin(angleRad) * speed;

		//弾を描画
		g.fillOval((int)sx-5, (int)sy-5, 10, 10);

		//座標が上または下に近づいたら移動方向を反転
		if ( ey <= 30 || ey >= 280 ) {
			targetMY *= -1;
		}
		ey += targetMY;
	}
}
かなりホーミング力が強いですが、数フレームごとに角度を保持したり角度を少しずつ変更することによってホーミング力の弱い動きも実装できます。
敵に向かって予測弾を撃つ
あまり実用的ではないかもしれませんが、単純な距離、時間、速さでの乗算、除算をして実装するサンプルを紹介します。
まずはターゲットの移動量を取得し現在の位置から150フレーム後の座標を算出します。
次に始点から150フレーム先の座標へのx座標とy座標の距離を求めて、それぞれを150で割ります。その結果が予測弾の移動量になります。
class DrawCanvas extends JPanel{

	//開始x,y
	double sx=50,sy=150;

	//目的地x,y
	int ex=350,ey=50;

	//移動量
	double mx,my;

	//目的地の移動速度
	int targetMY = 1;

	DrawCanvas(){
		//開始点と予測終了点の距離を求めて移動量を算出
		my = (ey + targetMY * 150 - sy) / 150;
		mx = (ex - sx) / 150;
	}
	public void paintComponent(Graphics g) {
		super.paintComponent(g);

		g.setColor(Color.BLACK);
		g.fillRect(0, 0, 400, 300);

		g.setColor(Color.WHITE);
		g.fillOval(ex-5, ey-5, 10, 10);

		g.setColor(Color.ORANGE);

		//移動処理
		sx += mx;
		sy += my;

		//弾を描画
		g.fillOval((int)sx-5, (int)sy-5, 10, 10);

		//座標が上または下に近づいたら移動方向を反転
		if ( ey <= 30 || ey >= 280 ) {
			targetMY *= -1;
		}
		ey += targetMY;
	}
}
速度を自由に決められない点で実用的ではないんですよねw
距離が変わると弾の速度が変わってしまうと思います。
目的地を複数設定し、その区間をループして移動させる
複数のポイントを配置し、それを線で結ぶように移動させるアニメーションです。
移動方向は始点から終点のx距離、y距離をatan2メソッドにかけて、sin、cos関数でx、y座標の移動量を算出します。(敵に向かって弾を撃つのと同じ)
方向転換する条件にピタゴラスの定理を利用し現在の距離と前のポイントとの距離を算出し、その大きさを始点と終点の距離と比較して判断しました。
方向転換するとなった場合は次のポイントへの移動量を算出して・・・の繰り返しです。
それではサンプルをご覧ください。
class DrawCanvas extends JPanel{
	//図形の頂点を定義します。
	VertexMove2D m = new VertexMove2D(
			new int[] {60,150,280,340,270,160,90,70}
			,new int[] {80,90,90,120,150,250,240,260}
			,8//頂点の数
			,2//移動速度
			,0//配列の0番を開始地点に
	);
	Rectangle r = new Rectangle(100, 100, 50, 50);
	public void paintComponent(Graphics g){
		Graphics2D g2 = (Graphics2D)g;
		g.setColor(Color.red);
		g2.draw(r);
		g.setColor(Color.green);
		m.draw(g2);

		m.move();
		r.x = (int) (m.getX()-r.width / 2);
		r.y = (int) (m.getY()-r.height / 2);
	}
}
class VertexMove2D{
	private double x;
	private double y;
	private final int[] xpoints;
	private final int[] ypoints;
	private final int npoints;
	private int currentPoint;
	private int nextPoint;
	private int speed;
	private double mx;
	private double my;
	private double checkValue;

	public VertexMove2D(int[] xpoints, int[] ypoints, int npoints, int speed, int initPoint) {
		this.xpoints = xpoints;
		this.ypoints = ypoints;
		this.npoints = npoints;
		this.speed = Math.abs(speed);
		this.currentPoint = initPoint;
		prepareNext();
	}
	private void prepareNext() {
		//次の終点を配列から取得
		int currentPoint = this.currentPoint + 1;
		if ( currentPoint >= npoints ) currentPoint = 0;
		this.currentPoint = currentPoint;
		this.nextPoint = (currentPoint + 1) % npoints;

		//始点と終点の設定
		int sx = xpoints[currentPoint];
		int sy = ypoints[currentPoint];
		int ex = xpoints[nextPoint];
		int ey = ypoints[nextPoint];

		//次の目的地に到着するまでの比較用の距離
		int vx = ex - sx;
		int vy = ey - sy;
		double rad = Math.atan2(vy, vx);
		mx = Math.cos(rad) * speed;
		my = Math.sin(rad) * speed;
		checkValue = vx * vx + vy * vy;
		x = sx;
		y = sy;
	}
	public void draw(Graphics g) {
		g.drawPolygon(xpoints, ypoints, npoints);
	}
	public void move() {
		//毎フレーム移動処理
		double xx = x + mx;
		double yy = y + my;

		int sx = xpoints[currentPoint];
		int sy = ypoints[currentPoint];
		double vx = sx - xx;
		double vy = sy - yy;
		if ( checkValue <= vx * vx + vy * vy ) {
			prepareNext();
		} else {
			x = xx;
			y = yy;
		}
	}
	public double getX() {
		return x;
	}
	public double getY() {
		return y;
	}
}
実行結果
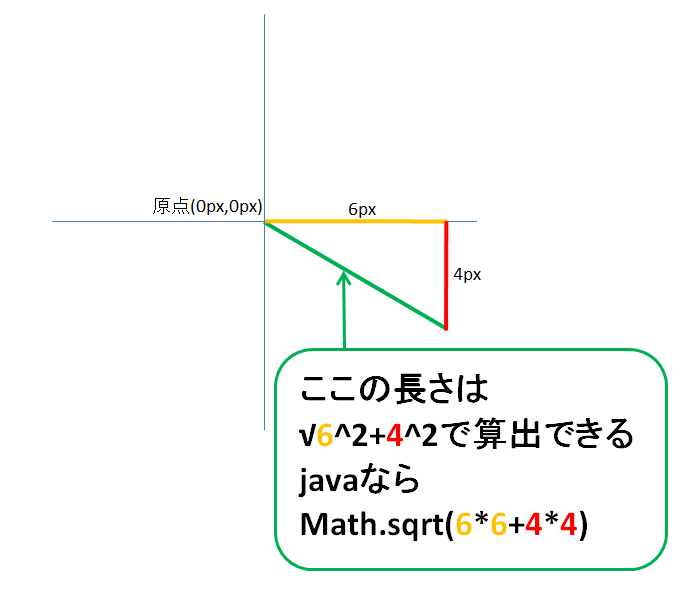
ここで出てきたピタゴラスの定理とは
【 距離 ^ 2 = X座標距離 ^ 2 + Y座標距離 ^ 2 】
を表す公式です。
2DプログラミングではX座標とY座標はプログラマが定義しているため、すぐに取得できるのですが距離はわからないです。
そんな距離を出したいときに「X座標距離 ^ 2 + Y座標距離 ^ 2」を計算することで「距離 ^ 2」を求めることができます。
あとは二乗を消したいので平方根を求められれば距離を算出できます。平方根はsqrtメソッドを利用すればOKです。
ただ、今回のサンプルでは正確な距離を知りたいのではなく、距離の大小を比較したいだけなため平方根の処理はしてもしなくても一緒です。
よって平方根の算出は無駄な処理となってしまうので利用せず実装しました。
ピタゴラスの定理で距離の算出
しょぼい弾幕みたいなのを作ってみる
ここで紹介した内容を応用するだけでも、東方のような弾幕を作ることもできるはずです。
複数のアニメーションを順番に実行させた、簡易弾幕用クラスのサンプルを用意してみました。
class DrawCanvas extends JPanel{
	Barrage b1 = new Barrage(false, 70);
	Barrage b2 = new Barrage(true, 140);

	@Override
	public void paintComponent(Graphics g) {
		super.paintComponent(g);
		b1.update();
		b2.update();
		b1.draw(g);
		b2.draw(g);
	}
}
class Barrage{
	int frameCount;

	//回転弾用データ
	double cx=200,cy=150;
	double distanceX;
	double distanceY;
	double initDistance;
	double aggregationSpeed;
	double rotateSpeed;
	double rotateSpeedUp;
	double[] rad = new double[36];

	//グラデーション用データ
	float[] radialFloat = new float[] {0.0f,1.0f};
	Color[] radialColor = new Color[] {Color.BLUE,new Color(255,0,180)};
	double radialRad;

	Barrage(boolean isInvert, double initDistance) {
		for ( int i = 0;i < rad.length;i++ ) {
			rad[i] = Math.toRadians(i * 10);
		}
		this.rotateSpeedUp = Math.toRadians(isInvert ? 0.1 : -0.1);
		this.initDistance = initDistance;
		this.radialRad = rotateSpeedUp < 0 ? rad[0] : rad[rad.length / 2];
	}

	void update() {
		frameCount++;
		radialRad += rotateSpeedUp < 0 ? Math.toRadians(5) : Math.toRadians(-5);
		if ( frameCount < 120 ) {
			updateProc1();
		} else if ( frameCount < 210 ) {
			if ( frameCount == 120 ) aggregationSpeed = distanceX / 120;
			updateProc2();
		} else {
			updateProc3();
		}
	}

	//中心点からinitDistanceまで弾を広げます。
	private void updateProc1() {
		distanceX+=3;
		distanceY+=3;
		if ( distanceX > initDistance ) {
			distanceX = initDistance;
		}
		if ( distanceY > initDistance ) {
			distanceY = initDistance;
		}
	}

	//回転させながら中心点へ移動させます。
	private void updateProc2() {
		distanceX-=aggregationSpeed;
		distanceY-=aggregationSpeed;
		rotateSpeed+=rotateSpeedUp;
		if ( rotateSpeed < 0 ) {
			radialRad += Math.toRadians(1) - rotateSpeed;
		} else {
			radialRad += Math.toRadians(-1) - rotateSpeed;
		}
		for ( int i = 0;i < rad.length;i++ ) {
			rad[i] += rotateSpeed;
		}
	}

	//中心点から楕円上に広げます。
	private void updateProc3() {
		aggregationSpeed+=0.2;
		distanceX+=aggregationSpeed*1.5;
		distanceY+=aggregationSpeed;
		rotateSpeed+=rotateSpeedUp;
		if ( rotateSpeed < 0 ) {
			radialRad += Math.toRadians(1) - rotateSpeed;
		} else {
			radialRad += Math.toRadians(-1) - rotateSpeed;
		}
		for ( int i = 0;i < rad.length;i++ ) {
			rad[i] += rotateSpeed;
		}
	}

	void draw(Graphics g) {
		//グラデーションの適用
		Graphics2D g2 = (Graphics2D)g;
		RadialGradientPaint rgp = new RadialGradientPaint(
				Math.round(Math.cos(radialRad) * distanceX + cx)
				, Math.round(Math.sin(radialRad) * distanceY + cy)
				, 50
				, radialFloat
				, radialColor
		);
		g2.setPaint(rgp);

		//現在設定された回転情報と距離に沿った弾を描画します。
		for ( int i = 0;i < rad.length;i++ ) {
			int x = (int) Math.round(Math.cos(rad[i]) * distanceX + cx - 5);
			int y = (int) Math.round(Math.sin(rad[i]) * distanceY + cy - 5);
			g.fillOval(x, y, 10, 10);
		}
	}
}
実行結果
弾幕のサンプルクラス、Barrageは弾を円状に36個配置し、中心点へ向かいながら回転させたあと、速度を上げながら広げる処理を実行します。
グラデーションクラスを利用し、弾の回転とは逆回転で配色されるように処理しています。