【Java】Raspberry Piで赤外線送信
pigpioを使った赤外線受信をJavaで実装してみたので、自分用に内容を記事にしときたいと思います。
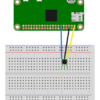
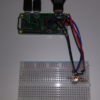
前回の記事で赤外線送信を動かす為の配線を行いましたので、これを動かしていきます。
http://abyz.me.uk/rpi/pigpio/code/irrp_py.zipの赤外線送信のpythonコードをJavaに置き換えただけです。
Javaで試す場合、いちいちラズパイでコンパイルするのは面倒なのでリモートでテストしていきます。
リモートでGPIO操作を行う場合、リモートGPIOの有効化を行う必要があります。リモートGPIOの有効化は下記の記事で説明しています。
当然ですが、ラズパイ側のpigpioデーモンも起動しておいてくださいね。
使用するライブラリはこれ。
https://github.com/nkolban/jpigpio
一部ライブラリのバグを修正した奴は私がアップしています。
https://github.com/nompor/jpigpio
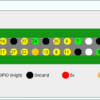
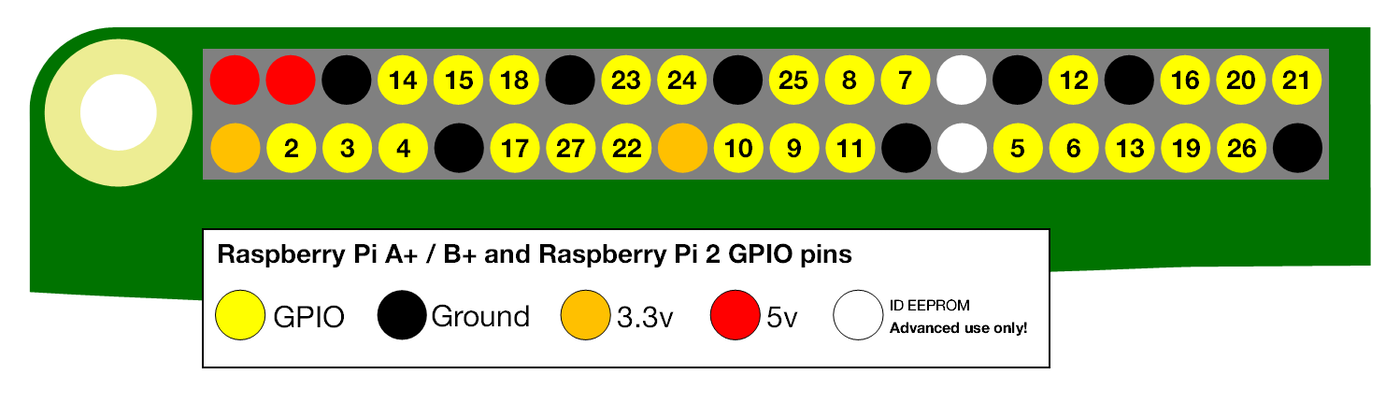
プログラム上で指定するのはピン番号ではなくGPIO番号です。
ラズパイのGPIO番号
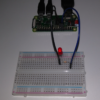
プログラムは赤外線受信の記事で生成したJSONテキストを読み込み赤外線LEDを点灯させ、TVなどの家電を操作します。
import java.nio.file.Files;
import java.nio.file.Paths;
import java.util.ArrayList;
import java.util.Arrays;
import java.util.HashMap;
import java.util.List;
import java.util.stream.Collectors;

import jpigpio.Pigpio;
import jpigpio.PigpioException;
import jpigpio.PigpioSocket;
import jpigpio.Pulse;


public class InfraredSendOsi5la5113aTest {

	int GPIO       = 18;
	String FILE       = "recv.txt";
	int GLITCH     = 100;
	int PRE_MS     = 200;
	int POST_MS    = 150;
	int FREQ       = 38;
	boolean VERBOSE    = true;
	int SHORT      = 10;
	int GAP_MS     = 100;
	int TOLERANCE  = 15;

	int POST_US    = POST_MS * 1000;
	int PRE_US     = PRE_MS  * 1000;
	double GAP_S      = GAP_MS  / 1000.0;
	double TOLER_MIN =  (100 - TOLERANCE) / 100.0;
	double TOLER_MAX =  (100 + TOLERANCE) / 100.0;

	PigpioSocket pi = null;


	List<Pulse> carrier(int gpio, double frequency, double micros) {
		List<Pulse> wf = new ArrayList<>();
		double cycle = 1000.0 / frequency;
		int cycles = (int)Math.round(micros/cycle);
		int on = (int)Math.round(cycle / 2.0);
		int sofar = 0;
		for (int c=0;c < cycles;c++) {
			int target = (int)(Math.round((c+1)*cycle));
			sofar += on;
			int off = target - sofar;
			sofar += off;
			wf.add(new Pulse(1<<gpio, 0, on));
			wf.add(new Pulse(0, 1<<gpio, off));
		}
		return wf;
	}

	public static void main(String[] args) throws PigpioException {
		new InfraredSendOsi5la5113aTest().execute();
	}

	public void execute() throws PigpioException {

		String host = "192.168.22.122";//IPは変えてください。
        pi = new PigpioSocket(host, 8888);
        pi.gpioInitialize();

        List<Integer> code = null;
		try {
			String s = Files.readString(Paths.get("recv.txt"));
			s = s.replaceAll("\\[|]|\\s", "");
			code = Arrays.stream(s.split(",")).map(e -> Integer.parseInt(e)).collect(Collectors.toList());
		}catch(Exception e) {
			e.printStackTrace();
		}


		pi.gpioSetMode(GPIO, Pigpio.PI_OUTPUT);

		pi.waveAddNew();
		System.out.println("Playing");

		HashMap<Integer,Integer> marks_wid = new HashMap<Integer,Integer>();
		HashMap<Integer,Integer> spaces_wid = new HashMap<Integer,Integer>();

		int[] wave = new int[code.size()];

		for( int i=0;i< code.size();i++) {
			int ci = code.get(i);
			if ((i & 1) == 1){
				if (!spaces_wid.containsKey(ci)) {
					pi.waveAddGeneric(new ArrayList<>(List.of(new Pulse(0, 0, ci))));
					spaces_wid.put(ci,pi.waveCreate());
				}
				wave[i] =  (int)spaces_wid.get(ci);
			}else {
				if (!marks_wid.containsKey(ci)){
					List<Pulse> wf = carrier(GPIO, FREQ, ci);
					pi.waveAddGeneric(new ArrayList<>(wf));
					marks_wid.put(ci,pi.waveCreate());
				}
				wave[i] = (int)marks_wid.get(ci);
			}
		}


		pi.waveChain(wave);

		while (pi.waveTxBusy()) {
			try {
				Thread.sleep(200);
			} catch (InterruptedException e) {
				e.printStackTrace();
			}
		}

		for(Integer i :marks_wid.keySet() ){
			pi.waveDelete(marks_wid.get(i));
		}

		marks_wid = new HashMap<Integer,Integer>();

		for(Integer i :spaces_wid.keySet() ){
			pi.waveDelete(spaces_wid.get(i));
		}
		spaces_wid = new HashMap<Integer,Integer>();

		pi.gpioTerminate();
	}
}
実行結果コンソール
Playing
記録した赤外線リモコンと同じ操作ができれば成功です。
関連記事