
【JavaFX】setViewportを利用したドット絵アニメーション
本稿はJavaFXで複数画像を利用したドットアニメーションを実装してみたいと思います。
画像の差し替えアニメーションはgifファイルを用意しても処理できるのでそれを利用してもいいのですが、私はpngファイルをメインに使用していきたいので、複数の画像を同じサイズで結合したpngファイルを使用してアニメーションする方法を考えていきたいと思います。
1.画像の切り出し
結合画像をアニメーションさせるには、個々の画像を切り出して表示する必要があります。
結合した画像を切り出す方法を考えたのですが、真っ先に浮かんだのが、WritableImageクラスを利用して切り出した画像を個々のオブジェクトとして生成する方法とsetViewportによる指定です。
今回はImageViewのsetViewportの設定で実装する方法をメインにやってみようと思います。
画像サンプルはこちらのドット絵を用意しました。
nono.png
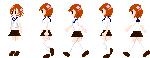
一つの絵を30×58とし、5枚を結合しています。
setViewportメソッドはRectangle2Dオブジェクトを引数にとり、ここには画像のどこの座標を表示するのかを指定します。
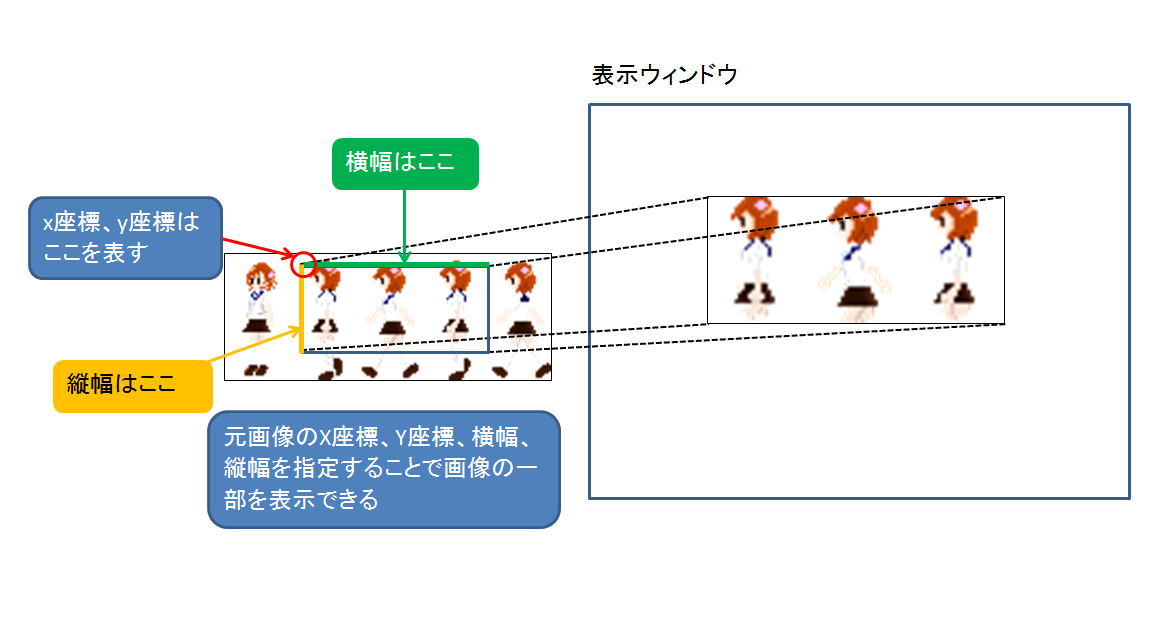
例えば、今回の画像で3枚目の絵を表示したい場合はx=60,y=0,横幅=30,縦幅=58と指定することで表示可能となります。
プログラムだとこんな感じ。
Rectangle2D viewport = new Rectangle2D(60,0,30,58);
それでは、実際にウィンドウに表示して確認するサンプルを見ておきましょう。
import java.io.File;

import javafx.application.Application;
import javafx.geometry.Bounds;
import javafx.geometry.Rectangle2D;
import javafx.scene.Scene;
import javafx.scene.image.ImageView;
import javafx.scene.layout.Background;
import javafx.scene.layout.BackgroundFill;
import javafx.scene.layout.Pane;
import javafx.scene.paint.Color;
import javafx.stage.Stage;

public class Test extends Application{


	@Override
	public void start(Stage primaryStage) throws Exception {
		Pane p = new Pane();
		Scene scene = new Scene(p, 400, 300);
		primaryStage.setScene(scene);
		primaryStage.show();
		p.setBackground(new Background(new BackgroundFill(Color.GRAY, null, null)));

		//画像オブジェクト
		ImageView img = new ImageView(new File("nono.png").toURI().toString());

		//表示位置を指定
		Rectangle2D viewport = new Rectangle2D(60,0,30,58);
		img.setViewport(viewport);

		//画像が小さい場合は拡大しとこう
		img.setScaleX(3);
		img.setScaleY(3);

		//中央に配置して表示
		Bounds b = img.getBoundsInLocal();
		img.setX(scene.getWidth()/2 - b.getWidth() / 2);
		img.setY(scene.getHeight()/2 - b.getHeight() / 2);
		p.getChildren().add(img);

	}
}
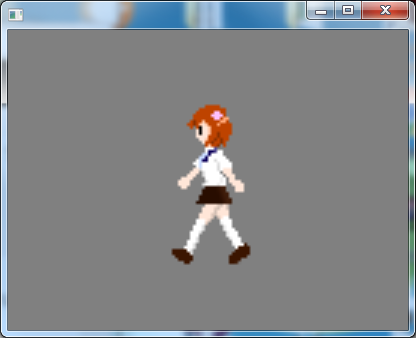
これで3枚目が表示されました。
2.表示範囲を順番に変更し、アニメーションさせる
さて、切り出し処理がわかれば後は簡単です。表示範囲を数フレームごとに切り替えるだけです。
この切り替えをどのように実装するかですが、複数のviewportを事前に定義しておき、配列番号を指定するだけで表示できるようにすることにします。
そして、画像番号の変更はtimelineで実装してみます。
Timelineの使用方法は下記の記事で紹介しています。
今回はInterpolatableは使用せず、もう少しシンプルで荒削り感の少ない実装にしたので、前の記事のTimeline紹介サンプルよりは簡単だと思います。
これらの画像表示位置の作成処理とTimelineを利用した画像番号変更処理を実装したオリジナルのImageViewクラスを定義して使いまわせるようにしてみます。
import java.io.File;

import javafx.animation.Interpolator;
import javafx.animation.KeyFrame;
import javafx.animation.KeyValue;
import javafx.animation.Timeline;
import javafx.beans.value.WritableValue;
import javafx.geometry.Rectangle2D;
import javafx.scene.image.Image;
import javafx.scene.image.ImageView;
import javafx.util.Duration;

/**
 * アニメーション処理を実行できるImageViewクラス
 *
 */
public class ImageAnimationView extends ImageView{

	private Rectangle2D[] viewports;
	private Index index = new Index();
	private Timeline timeline;
	private Duration dur;
	/**
	 * 指定した画像を横幅、縦幅で分割し、指定期間で1アニメーションを実行するImageAnimationViewオブジェクトを構築します。
	 * @param dur
	 * @param img
	 * @param width
	 * @param height
	 */
	public ImageAnimationView(Duration dur, Image img, int width, int height) {

		//画像が横に何枚あるか、縦に何枚あるかを算出します。
		int x = (int)img.getWidth() / width;
		int y = (int)img.getHeight() / height;

		//viewportの作成
		Rectangle2D[] viewports = new Rectangle2D[x * y];
		for ( int i = 0;i < y;i++ ) {
			for ( int j = 0;j < x;j++ ) {
				viewports[i*x+j] = new Rectangle2D(j * width, i * height, width, height);
			}
		}
		this.dur = dur;
		this.viewports = viewports;
		setViewport(viewports[0]);
		setImage(img);
		timeline = new Timeline();
	}
	/**
	 * 指定したファイルが表す画像を横幅、縦幅で分割し、指定期間で1アニメーションを実行するImageAnimationViewオブジェクトを構築します。
	 * @param dur
	 * @param img
	 * @param width
	 * @param height
	 */
	public ImageAnimationView(Duration dur, File file, int width, int height) {
		this(dur, new Image(file.toURI().toString()), width, height);
	}

	/**
	 * 画像番号の範囲をアニメーションするように設定します。
	 * @param startIndex
	 * @param endIndex
	 */
	public void setAnimationRange(int startIndex, int endIndex) {
		if ( timeline != null ) timeline.stop();
		index.setValue(startIndex);
		timeline.getKeyFrames().clear();

		//開始番号から終了番号までアニメーション
		KeyFrame kf = new KeyFrame(dur, new KeyValue(index, endIndex, Interpolator.EASE_BOTH));
		timeline.getKeyFrames().add(kf);
	}

	/**
	 * 全ての画像をアニメーションの対象とします。
	 */
	public void setDefaultAnimationRange() {
		setAnimationRange(0, getMaxIndex());
	}

	/**
	 * アニメーションを開始します。
	 */
	public void play() {
		timeline.play();
	}

	/**
	 * アニメーションのループ回数を指定します。
	 * @param value
	 */
	public void setCycleCount(int value) {
		timeline.setCycleCount(value);
	}

	/**
	 * 画像番号の最大値を取得します。
	 * @return
	 */
	public int getMaxIndex() {
		return viewports.length - 1;
	}

	private class Index implements WritableValue{
		private int index = 0;

		@Override
		public Integer getValue() {
			return index;
		}

		@Override
		public void setValue(Integer index) {
			this.index = index;
			setViewport(viewports[index]);
		}
	}
}
コンストラクタの引数は
ImageAnimationView(アニメーション時間,結合画像,表示サイズの横幅,表示サイズの縦幅)と指定するようにしています。
setAnimationRange(開始番号,終了番号)メソッドでアニメーションする画像番号の範囲を指定できます。
それでは実際にこのクラスを利用してキャラクターがちゃんと歩いているか見てみましょう。
import java.io.File;

import javafx.animation.Animation;
import javafx.application.Application;
import javafx.geometry.Bounds;
import javafx.scene.Scene;
import javafx.scene.layout.Background;
import javafx.scene.layout.BackgroundFill;
import javafx.scene.layout.Pane;
import javafx.scene.paint.Color;
import javafx.stage.Stage;
import javafx.util.Duration;

public class Test extends Application{


	@Override
	public void start(Stage primaryStage) throws Exception {
		Pane p = new Pane();
		Scene scene = new Scene(p, 400, 300);
		primaryStage.setScene(scene);
		primaryStage.show();
		p.setBackground(new Background(new BackgroundFill(Color.GRAY, null, null)));

		//画像アニメーション用クラスの利用
		ImageAnimationView img = new ImageAnimationView(Duration.millis(1000), new File("nono.png"), 30, 58);

		//歩いているグラフィックの範囲を表示
		img.setAnimationRange(1, img.getMaxIndex());

		//無限ループアニメーションの開始
		img.setCycleCount(Animation.INDEFINITE);
		img.play();

		//画像が小さい場合は拡大しとこう
		img.setScaleX(3);
		img.setScaleY(3);

		//中央に配置して表示
		Bounds b = img.getBoundsInLocal();
		img.setX(scene.getWidth()/2 - b.getWidth() / 2);
		img.setY(scene.getHeight()/2 - b.getHeight() / 2);
		p.getChildren().add(img);

	}
}
いいかんじに歩くのが確認できました。・・・いや画像枚数が少ない分カクカクしてて、いい感じではないかも。
2018/06/15・・・ImageAnimationViewの無駄な処理とバグを一部修正。もし、線形補完で実装したい場合は補正処理も自作したほうがいいかもしません。※最新のライブラリ版ImageAnimationViewは線形補完で実装しています。