
【JavaFX】オブジェクトに色、透明度を適用する
本稿ではオブジェクトに対して色や透明度を適用させてみたいと思います。
Colorクラスを利用し、色を変更する
Colorクラスを利用するとそのオブジェクトの色を変更することができます。awtのColorではなく、javafx.scene.paint.Colorなので間違えないように。
Colorクラスには大量の固定色が用意されていますのでそれを利用するのもよいですし、自作の色を作成することもできます。Colorクラスの固定色はこちらをご覧ください。
自作する場合は
new Color(赤の強さ,緑の強さ,青の強さ,不透明度)と定義してください。
これらの引数は0.0~1.0の間で指定しなければならず、0が弱くなり、1が強くなります。例えば紫にしたい場合はnew Color(1.0,0,1.0,1.0)と指定すれば良いです。
awtとは引数の解釈が異なるので注意しましょう。
指定したいColorオブジェクトはオブジェクトのsetStrokeメソッドに渡すと線の色を変更でき、setFillメソッドに渡すと塗りつぶしの色が変更できます。引数にnullを指定すると色無しに設定できます。
それではサンプルをご覧ください。
import javafx.application.Application;
import javafx.scene.Group;
import javafx.scene.Scene;
import javafx.scene.paint.Color;
import javafx.scene.shape.Ellipse;
import javafx.scene.shape.Rectangle;
import javafx.scene.text.Font;
import javafx.scene.text.Text;
import javafx.stage.Stage;
public class Test extends Application{
public static void main(String[] args) {
launch(args);
}
@Override
public void start(Stage primaryStage) {
View v = new View();
Scene scene = new Scene(v, 400, 300);
primaryStage.setScene(scene);
primaryStage.show();
}
}
class View extends Group{
public View() {
//矩形
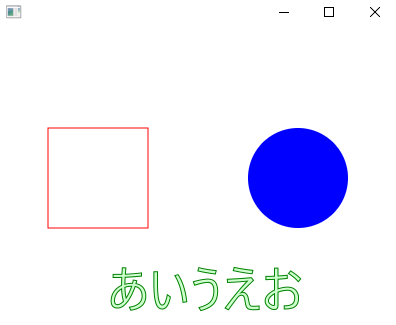
Rectangle rect = new Rectangle(50,100,100,100);
Color clr = new Color(1, 0, 0, 1);
rect.setStroke(clr);//線の色を指定
rect.setFill(null);//塗りつぶしをしない
getChildren().add(rect);
//円
Ellipse e = new Ellipse(300,150,50,50);
e.setFill(Color.BLUE);//青で塗りつぶし
getChildren().add(e);
//文字列
Text text = new Text(110,280,"あいうえお");
text.setFont(new Font(50));//文字の大きさ指定
text.setStroke(Color.GREEN);//文字の枠を緑で表示
text.setFill(new Color(0,1,0,0.2));//透明な緑で塗りつぶし
getChildren().add(text);
}
}
実行結果
オブジェクトに透明度を指定する
透明度を指定する方法は非常に簡単です。
setOpacity(不透明度)と定義しましょう。
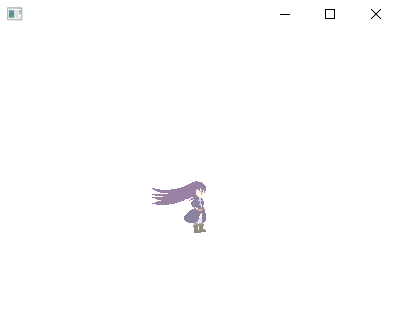
それでは画像を透明にしたサンプルを作成してみます。
サンプルで使用するのはこの画像

import java.io.File;

import javafx.application.Application;
import javafx.scene.Group;
import javafx.scene.Scene;
import javafx.scene.image.ImageView;
import javafx.stage.Stage;

public class Test extends Application{

	public static void main(String[] args) {
		launch(args);
	}

	@Override
	public void start(Stage primaryStage) {
		View v = new View();
		Scene scene = new Scene(v, 400, 300);
		primaryStage.setScene(scene);
		primaryStage.show();
	}

}

class View extends Group{
	public View() {
		//画像の表示
		ImageView view = new ImageView(new File("./latifa_dot.png").toURI().toString());
		view.setX(150);
		view.setY(120);
		view.setOpacity(0.5);
		getChildren().add(view);
	}
}
実行結果
こちらの設定方法はNodeオブジェクトであれば指定できますので、図形オブジェクトにも使用できます。